
Optimizing Video Capture Settings
Capturing analog video with computers can yield more accurate data than camcorders but also poses some new challenges. In this page I will describe some of these challenges and recommend solutions for improving the quality of your video captures for occultations.
Luma and Gamma correction
When observing occultations we wish to measure the intensity of the of the light emitted by the star (plus asteroid) – photometry. For analog video systems, increasing light intensity leads to a higher luma in the analog video signal Photometry has a long and important history in astronomy. Given my cursory knowledge of photometry I will not go into a lot of detail. I will just note that astronomers generally prefer to use devices with a linear response to intensity. And, somewhat unfortunately, video subsystems have been designed with a built-in non-linear relationship which is designed to improve the appearance of video for the human eye. As a result, most video cameras have a built in “gamma correction” which yields an exponential relationship between intensity of the incoming light and the luma (brightness) component of digital video data. Some cameras provide options to adjust this gamma correction. But most of our analog video cameras have a fixed gamma correction. If we wish to measure actual magnitude variations from an analog video signal, we must adjust the measurements of the video signal for the factor. And this can be a challenging adjustment given the variety of cameras and the variety of camera settings. Fortunately, in most cases we can accurately measure timings for occultations without correcting video data for “gamma”.
Dynamic range is another important consideration with analog video capture. In most cases, we are recording very dim target stars. In this situation we would like to accurately capture small variations in a low intensity signal (dim star). For this reason we would like to ensure a “clean” capture for the low intensity analog video signals. In a few rare situations, we record very bright stars which require careful consideration for the high intensity range of the video signal. Consider the following histogram of luma values in a single digital video frame.

The x-axis of this histogram is the luma value of a pixel, starting at 0 on the left and 255 on the right. The y-axis is the number of pixels which have a particular luma value. This histogram shows a large number of pixels with a low luma (near black) and fair number of pixels with high luma. This video frame for this histogram was a black background with an IOTA-VTI timestamp. The high luma values correspond to the VTI timestamp. If this was a video of a dim target star for an occultation, the star’s image would be located at the lower end of this histogram.
Rec 601 Luma considerations
Analog video has a long history with many different standards driven largely by broadcast television. The ITU is the primary international standards body which develops and documents these standards. In the early 1980s the ITU standard working on standards for digital representation of video signals. For our purposes (standard definition analog video), the primary standard of interest is known as Rec. 601 (see the links below for more details). Rec 601 specifies a digital representation based on a Y’CbCr color model (YUV based model). For occultation work, we are really only interested in the luma (corresponding to the intensity of the star). Most, if not all, of our cameras are monochrome cameras. And, at this point in time, we are only interested in recording the time of an occultation event (not spectral changes). However, the question of color models and the associated formats does have an impact on how this video data is processed on a computer.
In contrast to broadcast video, computer systems were designed to connect directly to monitors. As a result, most computer systems are designed to work with an RGB format for display data on screens. Thus, most computer based video data formats are also based on RGB. In addition most video editing software expects to work with RGB format data. So it should be no surprise to learn than video data in computers is often converted between YUV formats and RGB formats. In particular, the device drivers for our analog video capture devices (e.g. StarTech SVID2USB and Pinnacle Dazzle) generate YUV formatted data. And our programs for extracting light curves (LiMovie, Tangra, PyMovie) expect to work with RGB data. In the Windows OS, the DirectShow usually performs the conversion from YUV to RGB. And, in general, this conversion will occur when the video recording program (e.g. VirtualDub, OccuRec, IOTA Video Capture) records the occultation video.
The YUV/RGB conversion presents one particular concern for occultation recordings. With Rec 601, the luma values are limited to values in the range of [16,235], with 16 representing black and 235 representing white. Values below 16 and over 235 were “reserved” for undershoot and overshoot signals. In the histogram above, the values in red are values which are outside the range of [16,235]. The data stream from video capture devices is assumed to be Rec 601 format. As a result, when this data stream is converted from YUV to RGB format, all of the luma values outside the [16,235] range are clipped (forced to 16 or 235). Thus, in the example histogram above, we will lose a lot of information in the higher luma data – everything pixel with a luma value in red will changed to a luma value of 235. Note that the low intensity data will not be affected since there is very little data in the red range at the low end of the luma range. Given the likelihood that the data from these analog capture devices will undergo a YUV/RGB conversion at some stage, we obviously wish to ensure that no valuable luma information is clipped at this stage. Obviously, this means we wish to ensure that any valuable information is represented by luma values in the [16,235] range of the data from our analog capture devices. Now we will discuss some ideas for how to ensure that the luma data of our videos is in this safe range of [16,235].
Measuring the Luma range
I recommend using the free program VirtualDub2 to measure the luma values from your occultation video recording setup. VirtualDub2 is a more current update to the older VirtualDub than many of us have used in the past. I find that VirtualDub2 is more reliable on the current versions of Windows. The following description and screen shots will be based on VirtualDub2. You will find a link to the VirtualDub2 website in the links section below.
Obviously, your telescope has a big impact on the intensity of the signal delivered to the camera and, ultimately, affects the luma of the video data output from the video capture device. But it is important to realize that the both the camera and the specific video capture device also have a big impact on the luma values. If you have multiple camera and video capture devices, you should measure each combination separately.
Here are the steps I follow to measure the luma range using VirtualDub2:
- From the main startup screen, choose the menu option “Capture”, then “Capture AVI…”. VirtualDub2 will enter capture mode.
- Select your video capture device via the “Device” menu option and VirtualDub will show a live view of your incoming video data.
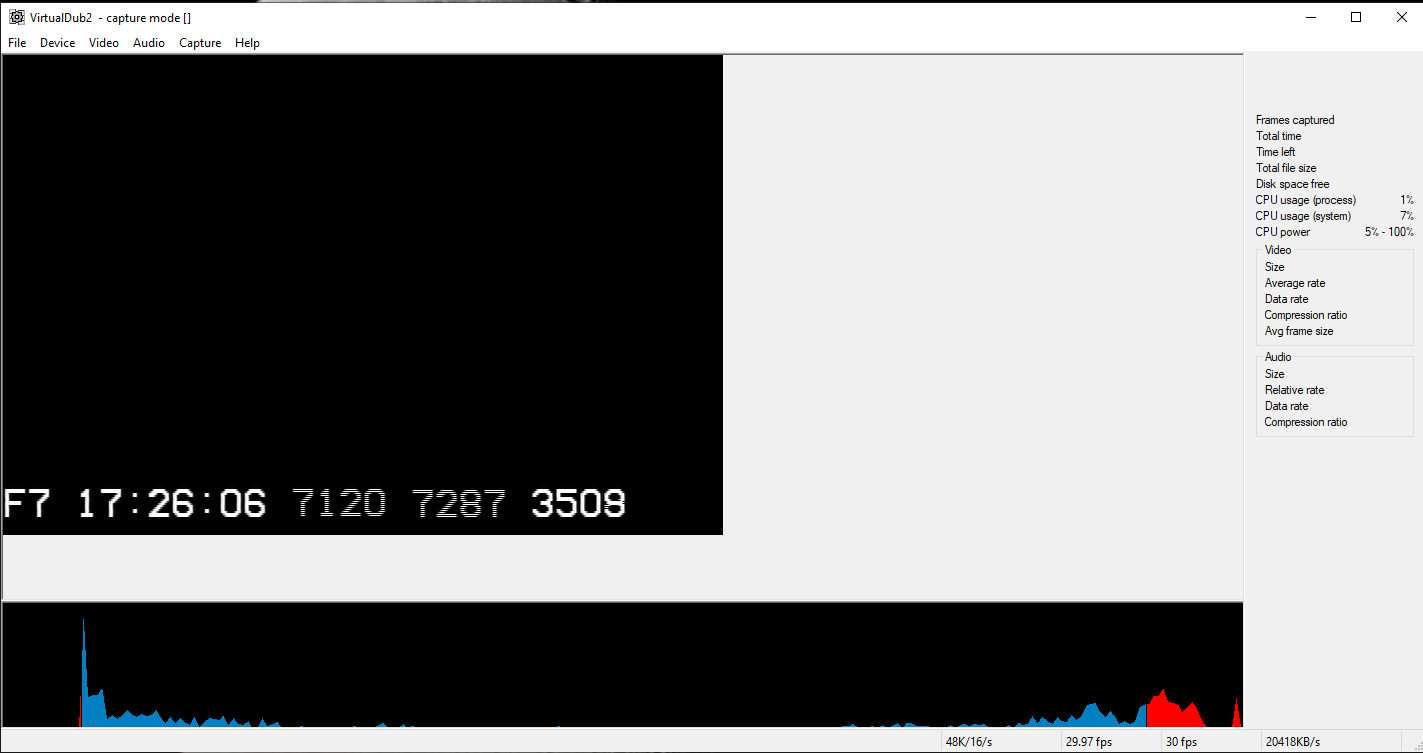
- Now select the menu option “Video/Histogram” to display the histogram below the video data frame. Here is a sample screen shot from my system. Luma values outside the [16,235] range are shown in red.
Adjusting the Luma range from your capture device
Now we get to the interesting part of the discussion. How can we adjust matters to improve the quality of our eventual data analysis of the recording? From the section above on Rec 601 luma clipping we see that we wish to ensure that the important intensities are represented by luma values in the range of [16,235]. We are almost always targeting dimmer stars and therefore worried about low intensity signals. So I will begin with a suggestion for improving the quality of the data for low intensities. Later I will comment on suggestions for high intensity targets.
Many years ago, video broadcast engineers developed solutions for improving various aspects of analog video signals. When incorporating/merging video data from multiple sources, they must often make adjustments to match incoming data to a broadcast stream. The “video processing amplifier” (aka video proc amp) has been a common hardware device for this purpose. Video proc amps can adjust the brightness (luma), contrast, color and other aspects of a video signal. Video proc amps are still in use today, and would be a solution for adjusting luma values, but these devices are expensive. Fortunately, most analog capture devices offer “video proc amp” settings via the device driver. And we can use these video proc amp settings to adjust the luma values captured for the incoming video signal from a camera.
The video proc amp settings of a device driver are only accessed via the “capture pin” for the device driver. Therefore any changes to these settings must be exposed by other software. Both IOTA Video Capture and VirtualDub2 provide dialogs which allow the user to change the video proc amp settings. As of this writing, I am not sure if OccuRec provides a dialog for the video proc amp settings of the device driver.
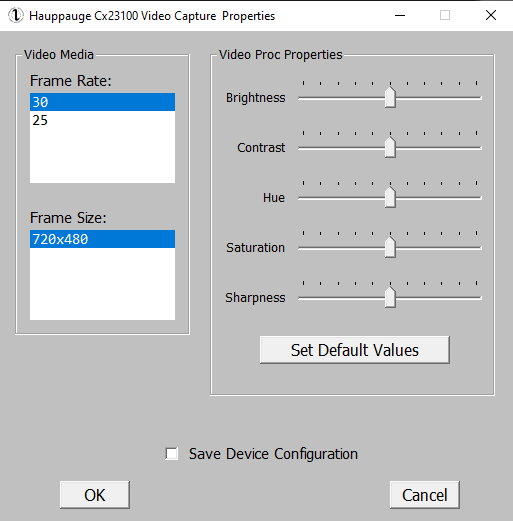
With IOTAVC, you access the video proc amp settings via the menu item “Options/Video Device Properties”. Here is a screen shot of this video device properties dialog:
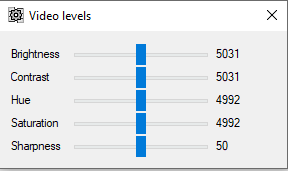
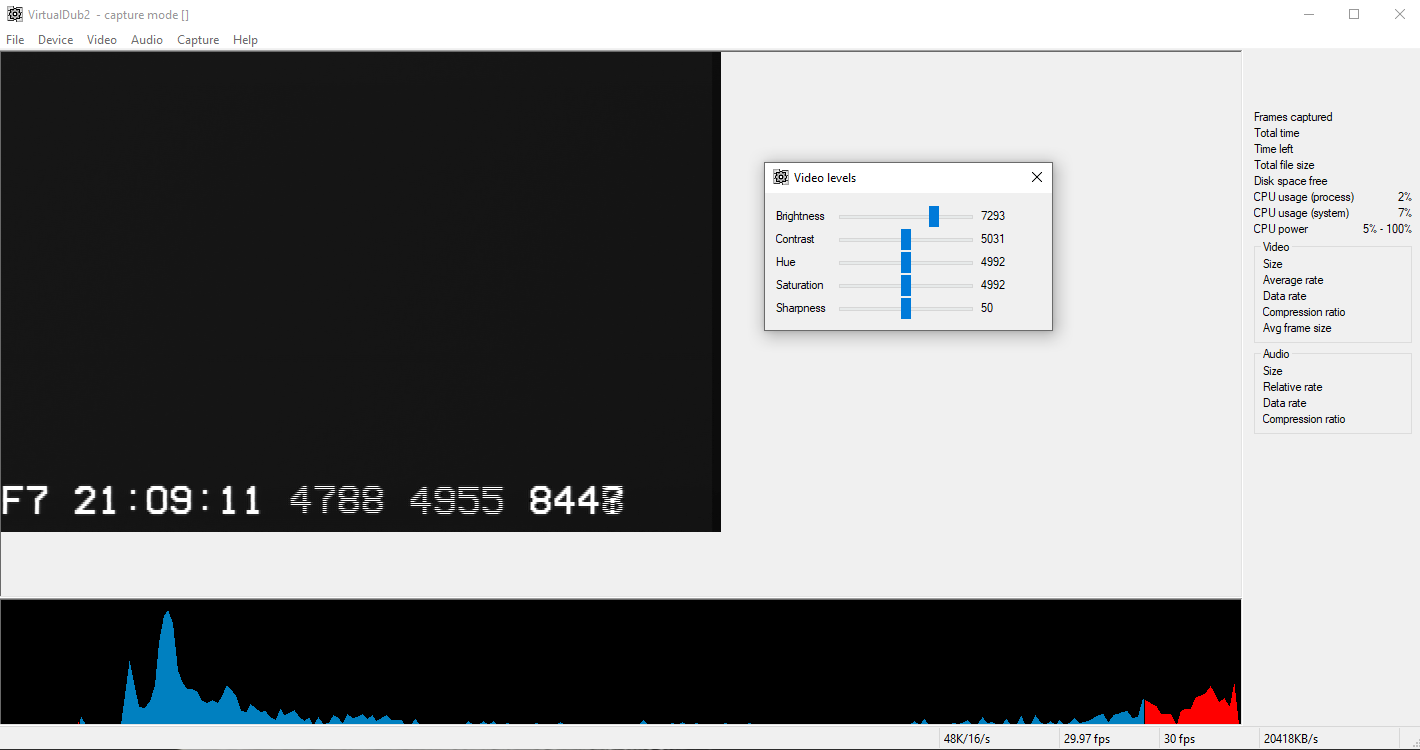
With VirtualDub2, you have two options for accessing the video proc amp settings while in capture mode. The best option is the menu item “Video/Levels”, which displays this dialog:
I recommend you use VirtualDub2 to determine the best settings for each of your specific configurations of video camera and video capture device. Later you can use IOTAVC to verify your settings prior to recording data. But, VirtualDub2 is the best option to determine the settings because VirtualDub2’s histogram shows you when the luma values are outside the allowable range of [16,235]. Note: once you change the video proc amp settings for a driver, the settings will be retained and you will see the same settings when recording with any recording software (VirtualDub2, IOTAVC, or OccuRec).
Now we can look at a specific example of changing the proc amp settings. In the example I am aiming to improve the settings while recording a dim star. So I start by configuring the camera to mimic a low intensity scene. I covered the camera “lens” completely (with a lens cap). And, with an integrating camera, I set the exposure as short as possible and put the gain as low as possible. The result should be a very dark image. Here is a screen shot in VirtualDub2 with the video proc amp settings at the default values for this particular capture hardware:
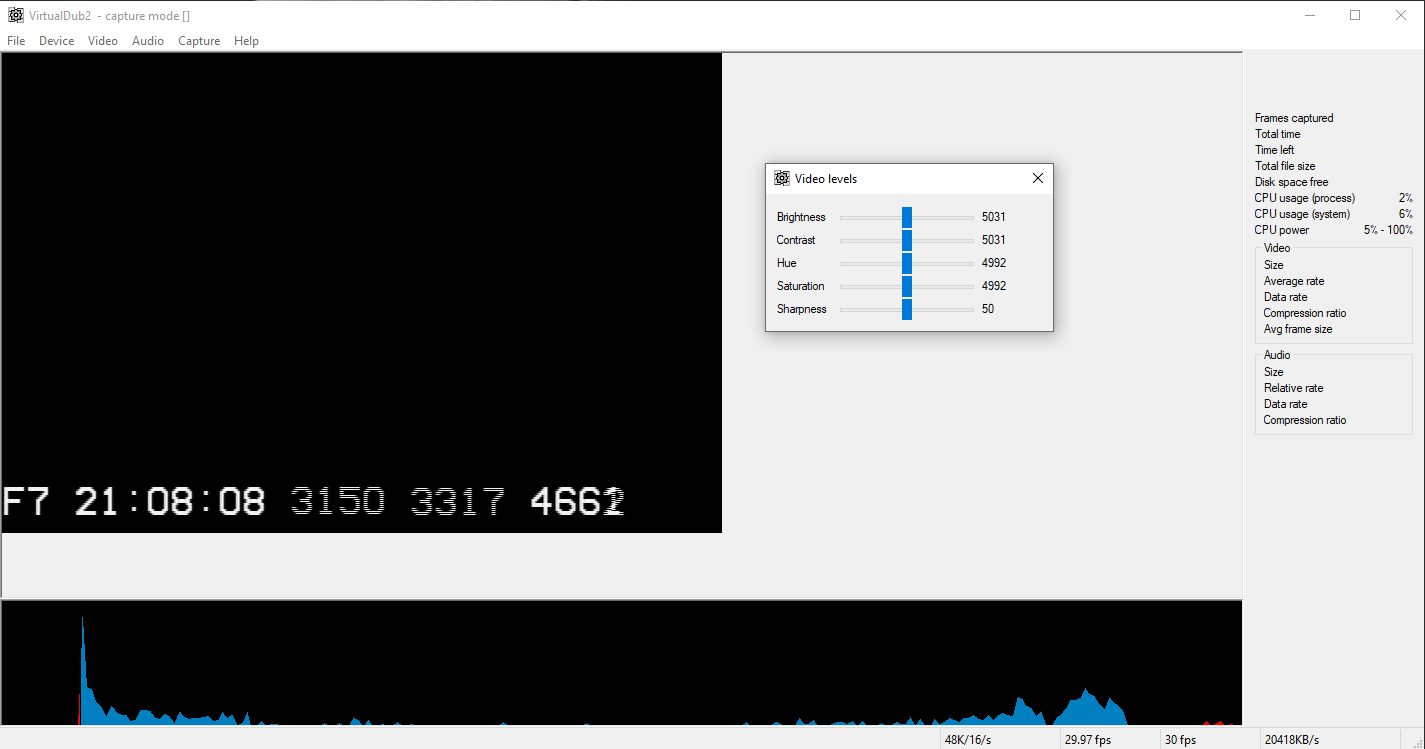
There is very little “red” in this histogram. At the outset this looks good – almost no values will be clipped. There is a tiny bit of red at the low end – a few pixels with luma values below 16. I have noticed that all of my video capture devices have a tendency to output a few pixels just below 16 when set at the default values. But is this the best we can do? Here is a screen shot after I adjust the brightness up further:
This looks MUCH better at the low intensities. We now see a pattern of luma values which matches the expectations for low intensity signals – showing a noisy distribution of luma values around a peak value. Yes, increasing the brightness has pushed the high intensity pixels beyond 235 – these values will be clipped to 235. But the low intensity data will be more accurate. And that is what I was aiming for in this case.
What about the other video proc amp settings? I suggest that you leave them at the default values when recording occultation data. I recommend that you only adjust the brightness setting. If your target star is bright and you cannot adjust your camera to lower the intensity of the incoming signal, you can lower the brightness setting to avoid clipping the luma values at the high end.
Video Capture Hardware notes
I have done a bit of testing with the StarTech SVID2USB devices and the Hauppauge USBLive2 device.
The video proc amp setting seem to work well with the StarTech devices. The default video proc amp setting seem to yield a fairly good distribution of low end luma values with a low intensity signal. But you can probably improve matters by adjusting the settings as described above.
However, at this time, I do not recommend the Hauppauge USB Live2 device for occultation work. With the default video proc amp settings, the low intensity video data (a black scene) is clipped off. And, unfortunately, the device driver has a bug – whenever you start a capture the video proc amp settings are ignored and the device operates with the default settings. You can adjust the video proc amp setting to yield a better histogram. But you cannot record video with these settings.
Links
- VirtualDub2
- Rec. 601 – Wikipedia
- About YUV Video – Win32 apps | Microsoft Docs
- Recommended 8-Bit YUV Formats for Video Rendering – Win32 apps | Microsoft Docs
- Color FAQ – Frequently Asked Questions Color (poynton.ca)
- Gamma FAQ – Frequently Asked Questions about Gamma (poynton.ca)
- YUV and luminance harmful (poynton.ca)
- DV.com | Inspiring and Empowering Creativity (archive.org)
Updated 2021-Apr-28 (Steve Preston)